
WINDOW SILL REPAIR GUIDE
Repairing Rotten Window Sills
A localized area may be repairable when the moisture source can be corrected and suitable wood remains around the prepared opening. Inspect the sill, jambs, frame, and nearby wall before choosing repair materials.
THE SHORT ANSWER
Localized Sill Damage May Be Repairable
A rotten window sill may be repairable when the deterioration is localized, the moisture source can be corrected, and suitable wood remains around the prepared area. Replacement or further evaluation may be more appropriate when deterioration extends into the jambs, frame, wall, or adjoining structure.
A Localized Repair May Fit
The affected area has a clear boundary, suitable wood remains around it, and the water-entry condition can be corrected before preparation begins.
Expand the Evaluation First
Damage continues into the jambs, frame, wall, connected trim, or concealed areas—or the condition of the remaining wood is uncertain.
REPAIRABILITY FIRST
Establish the Repair Scope Before Choosing Products
The visible sill surface may not show the complete condition. Product selection does not determine whether the window assembly or adjoining construction is suitable for a localized repair.
Pause when the condition extends beyond the sill
Get appropriate help when there is movement, widespread deterioration, hidden wall moisture, damage at connected framing, or uncertainty about suitable remaining wood. WRP can assist with product planning after the repair scope is understood.
INSPECT THE CONNECTED ASSEMBLY
Inspect the Sill and the Connected Window Frame
Check beyond the most visible soft spot. Water can enter at joints and edges, then affect nearby wood or concealed surfaces.
Check the Sill Nose and End Grain
Inspect the front edge, underside, ends, cracks, fastener areas, and any location where coatings have opened or water can remain.
Check Jamb Joints and Lower Corners
Probe gently around the sill-to-jamb joints and lower frame corners. Look for loose fibers, separation, movement, or deterioration beyond the sill face.
Look for Interior or Wall-Side Moisture
Check accessible interior trim and nearby wall surfaces for staining, dampness, coating failure, or another sign that water has traveled beyond the exterior sill.
CORRECT THE CAUSE
Correct the Moisture Source Before Rebuilding
Repair material does not correct an active leak, failed joint, poor drainage path, or coating problem. Identify and address the water-entry condition before rebuilding the missing section.
Sill Slope and Runoff
Check whether water drains away from the window or remains at low spots, cracks, and damaged edges.
Sealant and Joints
Review open sill-to-jamb joints, failed sealant, and gaps where water can enter the window assembly.
Paint and Exposed Wood
Look for peeling coatings, open end grain, and unfinished areas that are repeatedly exposed to weather.
Concealed Moisture
Do not assume the issue is limited to the surface when staining or dampness appears inside or around the adjoining wall.
REPAIR OR REPLACE
Repair or Replace the Window Sill?
Base the decision on the complete prepared area and the condition of the connected assembly—not on the size of the visible paint defect alone.
Localized Repair May Be Considered When
- The deterioration is limited to a defined sill area.
- The moisture source can be corrected.
- Suitable wood remains around the prepared opening.
- The jambs, frame, wall, and adjoining construction are outside the damaged scope.
Replacement or Further Evaluation May Be Needed When
- Deterioration extends through a large portion of the sill or window assembly.
- Jambs, frame members, wall materials, or adjoining construction are affected.
- The window moves, leaks, or no longer operates as intended.
- Concealed moisture or remaining-wood conditions cannot be established confidently.
PREPARE THE LOCALIZED AREA
Remove Unsound Material and Prepare the Repair
Preparation begins only after the moisture source and repair boundary are understood. Follow current product instructions for surface condition, application, curing, and finishing.
Define the Boundary
Expose enough of the affected area to understand where deterioration ends and suitable wood begins.
Remove Unsound Material
Remove loose, soft, crumbling, and detached material without expanding into connected components outside the approved scope.
Clean the Area
Remove dust, loose fibers, failed coatings, and debris so the prepared surface can be assessed and treated according to current instructions.
Confirm Product Conditions
Before application, confirm that the wood and surrounding conditions meet the current requirements for the selected materials.
REBUILD THE MISSING SECTION
Rebuild the Missing Section
After repairability is established and preparation is complete, select materials for the actual condition. Do not use product selection as a substitute for evaluating the window assembly.
Choose the Repair-Material Category
Shallow cosmetic defects and deeper missing sections call for different materials. Compare the categories before choosing a product.
Prepare Suitable Remaining Wood
When current instructions and the prepared condition call for it, WRP Wood Consolidant may be part of the product plan.
Rebuild a Localized Missing Profile
WRP Epoxy Dough may be considered for an already-approved localized repair that requires rebuilding an edge, corner, or sill profile.
SHAPE, COAT, AND MAINTAIN
Shape, Prime, Paint, and Maintain
Complete the surface according to the repair plan and current product instructions. Finishing improves appearance and weather protection; it does not correct an unresolved leak or hidden assembly problem.
Restore the Intended Profile
After the rebuilding material has cured as directed, shape the localized area to maintain the sill's drainage path and planned profile.
Refine the Surface if Needed
Optional finishing products may be considered where surface refinement or texture is part of the project plan.
Prime and Paint
Use compatible primer and coating products appropriate to the window, repair material, and exterior exposure.
Maintain the Water-Shedding Details
Inspect coatings, joints, and drainage conditions periodically and address new openings or water entry when found.
EXISTING PAGE EVIDENCE
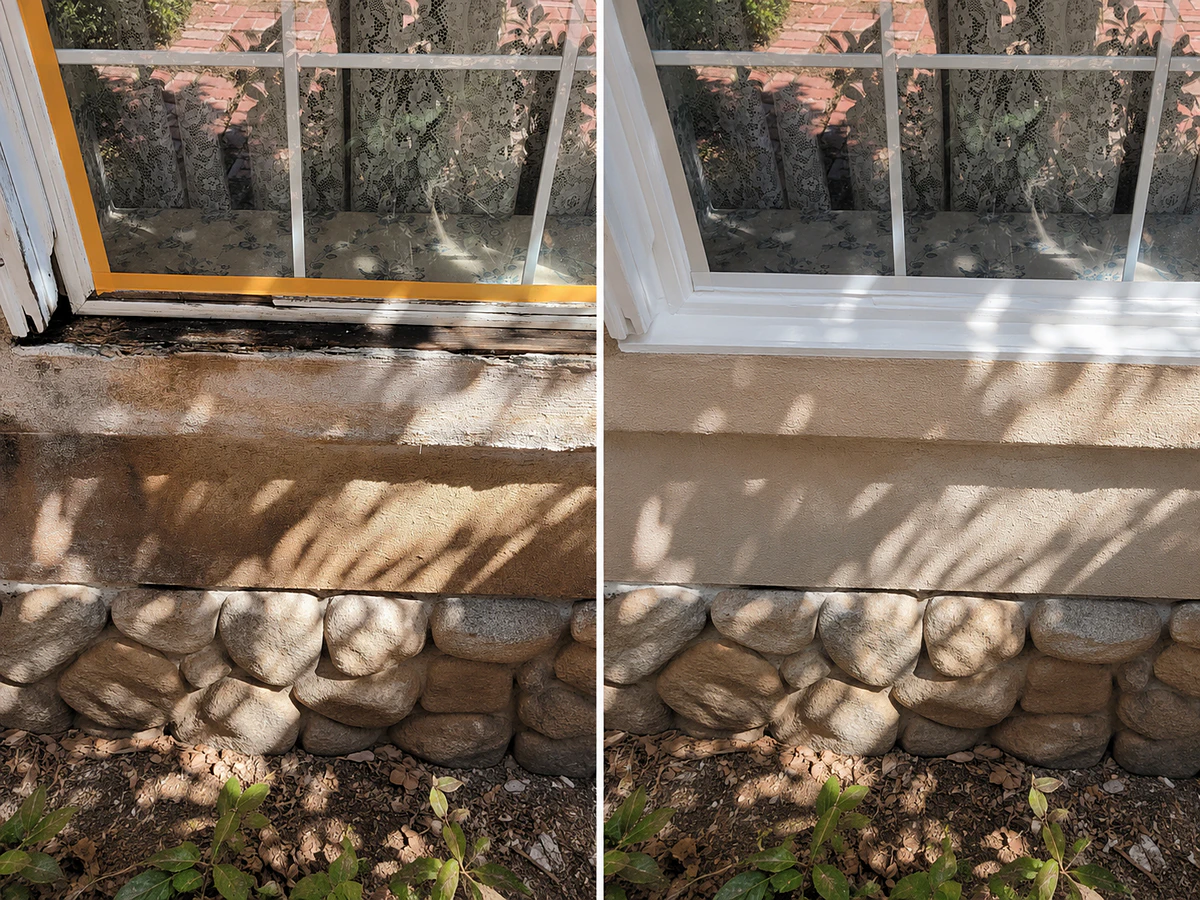
Window Sill Repair: Before and After
The retained page image presents before-and-after views of a localized exterior window sill repair. It documents the visible surface change without establishing that the same repair scope or materials apply to another window.
What the Image Shows
A deteriorated sill edge and the visible finished profile after localized repair work.
What Still Requires Project-Specific Review
The moisture source, concealed conditions, remaining wood, product selection, and connected window or wall condition must be evaluated for the actual project.
MATERIAL SELECTION
Choose Materials After Repairability Is Established
Estimate products and quantity only after the repair area has been prepared and its depth, shape, and connected conditions are understood.
Compare Published Kit Coverage
Use the current size guide to compare approximate coverage and understand why deeper or irregular areas can require more material.
Use Guided Product Questions
Use the Repair Wizard after the project is confirmed as a localized wood-repair candidate.
Follow Current Instructions
Review current technical documents for the selected materials before mixing, applying, curing, shaping, priming, or coating.
COMMON QUESTIONS
Window Sill Repair Questions
These answers keep moisture correction, repairability, preparation, and material selection in the right order.
Can a rotten window sill be repaired?
A localized area may be repairable when the moisture source can be corrected and suitable wood remains around the prepared opening. Damage extending into the frame, wall, or adjoining construction may require replacement or further evaluation.
When should a window sill be replaced?
Replacement or broader evaluation may be appropriate when deterioration is widespread, connected window or wall components are affected, the assembly moves or leaks, or the remaining condition cannot be established confidently.
Why do exterior window sills rot?
Common contributors include failed joints or coatings, exposed end grain, poor drainage, and repeated water entry that prevents the wood from drying.
How much damaged wood should be removed?
Remove loose and unsound material within the approved repair scope while retaining suitable original wood. The final boundary depends on what the prepared area reveals.
Does the moisture source need to be fixed first?
Yes. Rebuilding the visible sill does not correct an active leak, failed joint, drainage problem, or concealed moisture source.
How do I choose the right repair material?
Choose materials after inspection and preparation establish the repair condition. Compare the repair depth, missing profile, exposure, and current product instructions before ordering.